Selling Products Mode Overview
Switch to Selling Products view
To use the new mode, go to the Selling Lists tab and click "Switch to the Selling Products mode".

Selling Products view displays a separate item list for each connected marketplace account. Add a marketplace account before setting up the products here.
If the store had any Selling Lists previously, all products will be shown in the Selling Products list for the corresponding account:

When new items are added to the product list, Salestio will save them to a Selling List in the background. If you swap back to the Selling Lists mode, the items can be found in the "Default for account_name" Selling List.
Quick start guide for Selling Products mode
In this section, we will go over the main steps to set up the items in Selling Products mode and get them listed on the marketplace.
Connect a marketplace account
Before configuring the rest of the app, link all of the Amazon, eBay, and Etsy marketplace accounts that the store will use. Go to Salestio > Accounts tab to log in.
Each of the added accounts will be available to select in the Selling Products view:

Add products to the list
To start working with specific products, click "Add Products" at the top and select some of your Shopify items. When multiple marketplaces are available, confirm which ones should be used for the products. For example, when both Germany and Italy marketplaces are enabled for an Amazon account, they will be selectable here.

We suggest starting with one or two items to get an understanding of item management.
Selling Products mode has two ways to specify the product information: using Listing Data for individual products or Syncing rules for product groups.
Add Listing Data for individual products
To start configuring a specific product, click the pen icon in the list. The items have a separate configuration for different marketplaces. If the product will be listed in multiple marketplaces, make sure to select the Listing Data page from the correct column:

On this page, add the basic details like Fulfillment latency and product condition. For eBay, select the Business Policies, and indicate if it's an Auction or GTC listing. Other details, such as shipping location and dimensions, can also be specified here.

Below the general product settings, enable product creation to add the category and item specifics. This setting should be enabled for listing new products.
- - For Amazon, this is only needed for products that do not exist in the marketplace catalog.
- - For eBay and Etsy, creation data is always required to list new products.
Pick the marketplace category and fill in the related item specifics in the list that appears:

Save Listing Data for future listings
Salestio can automatically apply Listing Data to multiple products. Enable the option at the bottom to save your settings as a template:

From here, the template can be applied to all products or only select ones based on the filters. To select the product groups, pick the Shopify Categories, Product Types, or Collections, and the app will apply the settings to the rest of the items based on this match. Check the Syncing Rules page to review the saved templates.
If you keep this option unchecked, all the added attributes will be applied only to the current product.
Syncing Rules
Selling Products mode features the option to set multiple templates for product creation data, as well as price or quantity settings. Click "Syncing Rules" at the top to access all the profiles.
Each profile can be configured to apply to all products or select product groups. Product groups can be filtered by Shopify Product Type, Collection, or Category. Salestio automatically applies matching Sync Rules to selling products in your list.
Syncing rules are applied using the following priority:
- 1. Listing Data on individual products
- 2. Sync Rules for specific product groups
- 3. Sync Rules for "All Products"
The available conditions correspond to the product information on the Shopify page. You can mix and match different sets of conditions to target specific product groups in your Shopify store. Note the selector to match "all conditions" or "any condition" to target the product groups more precisely. Check some examples below:


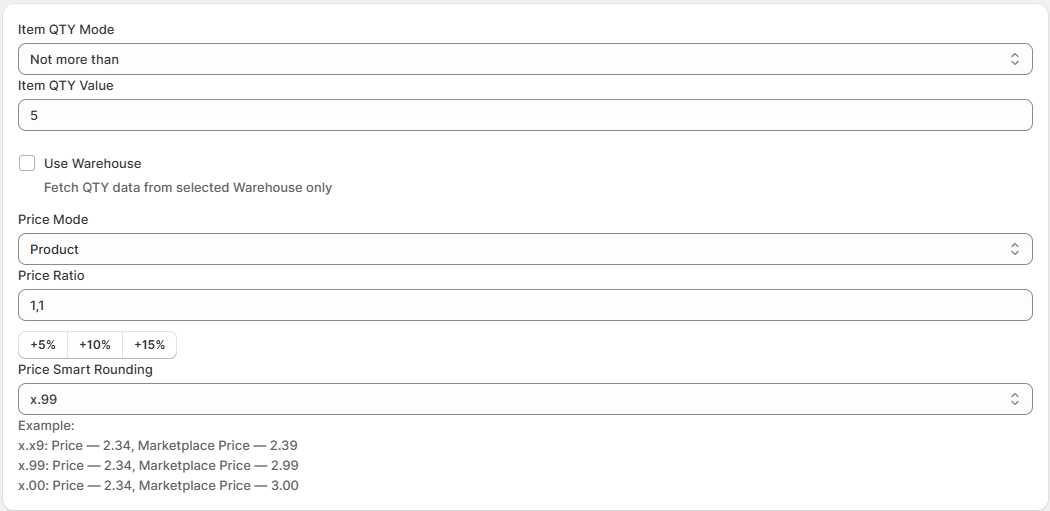
In "Price & QTY" rules, set alternative modes for product syncing, pick a specific warehouse, or enable price rounding:
In the Amazon tab, add templates with product creation information for Seller Central. Each template is saved for a specific account and marketplace pair.
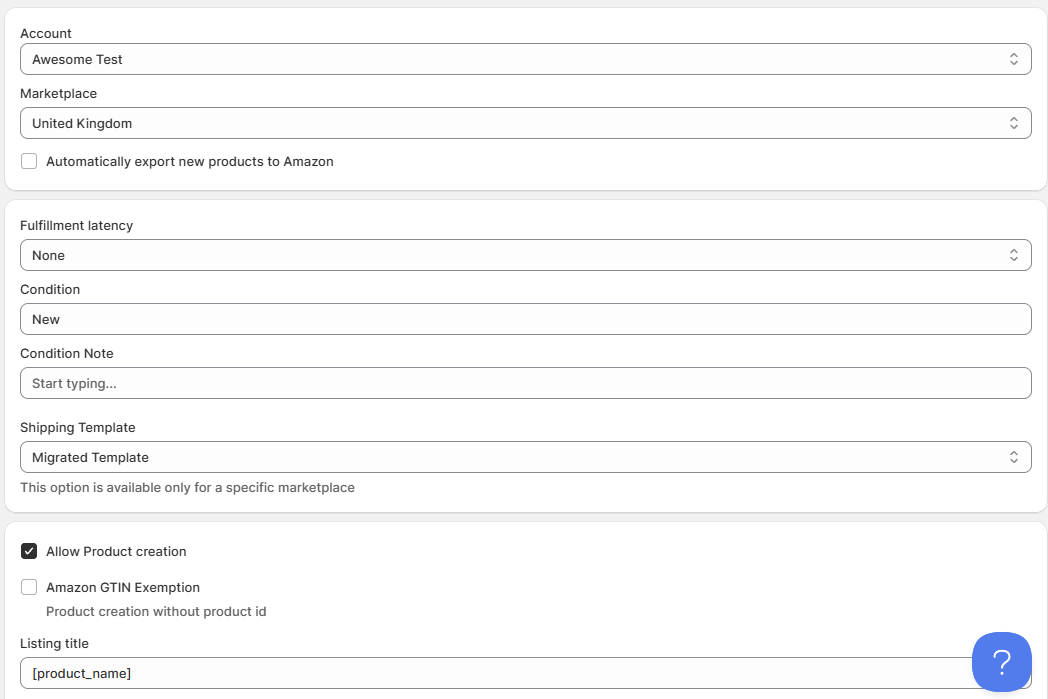
In the Amazon sync rule, set the fulfillment latency, product condition, and shipping template. Optionally, add a condition note. Below, enable product creation if you need Salestio to add new product listings to the Amazon catalog. With enabled product creation, set the target Amazon category and add product specifics below.
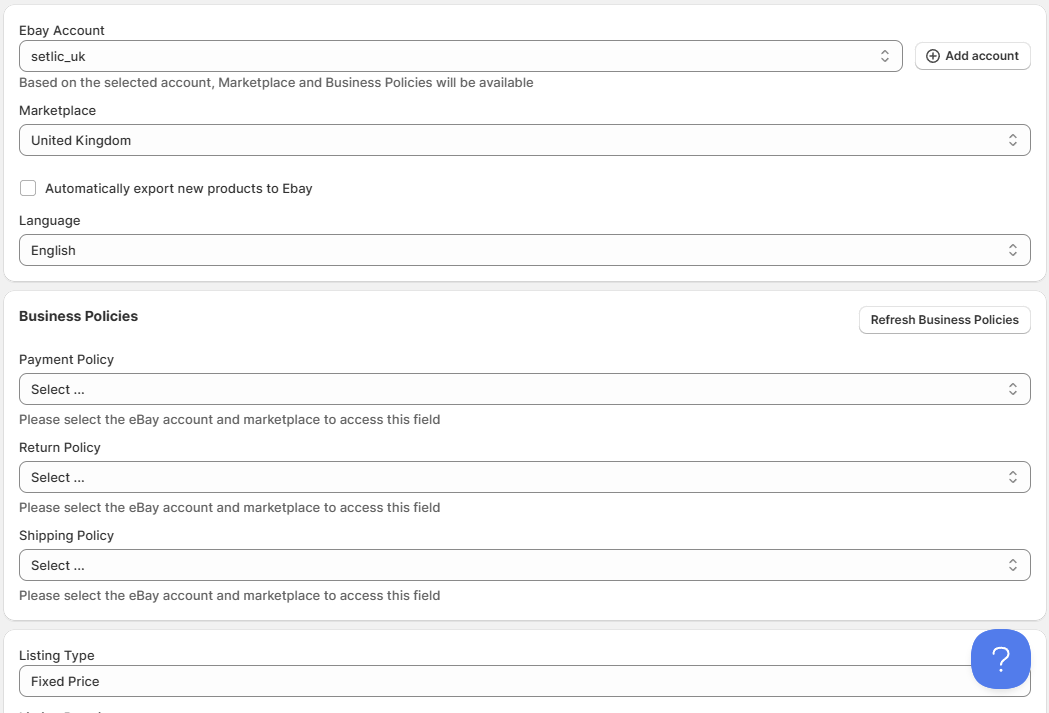
In the eBay tab, add product creation details related to eBay accounts. In this Sync Rule, select the target eBay account and marketplace. Set the listing type (auction/GTC), settings related to VAT, shipping location/dimensions, and Business Policies.
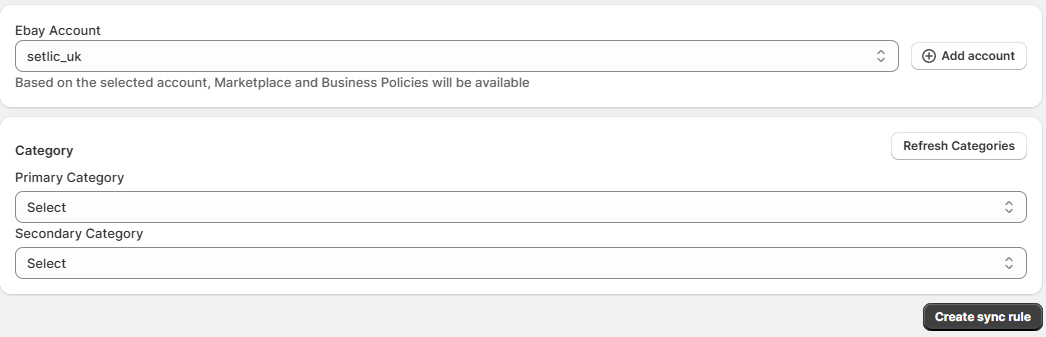
At the bottom, enable product creation to set the target eBay category and related item specifics. Salestio will automatically apply the saved specifics when publishing the products.
Users of the eBay Store program can assign their custom eBay categories using the "eBay Store Mapping" rules. If your eBay account has any custom categories, you can select them in this profile:
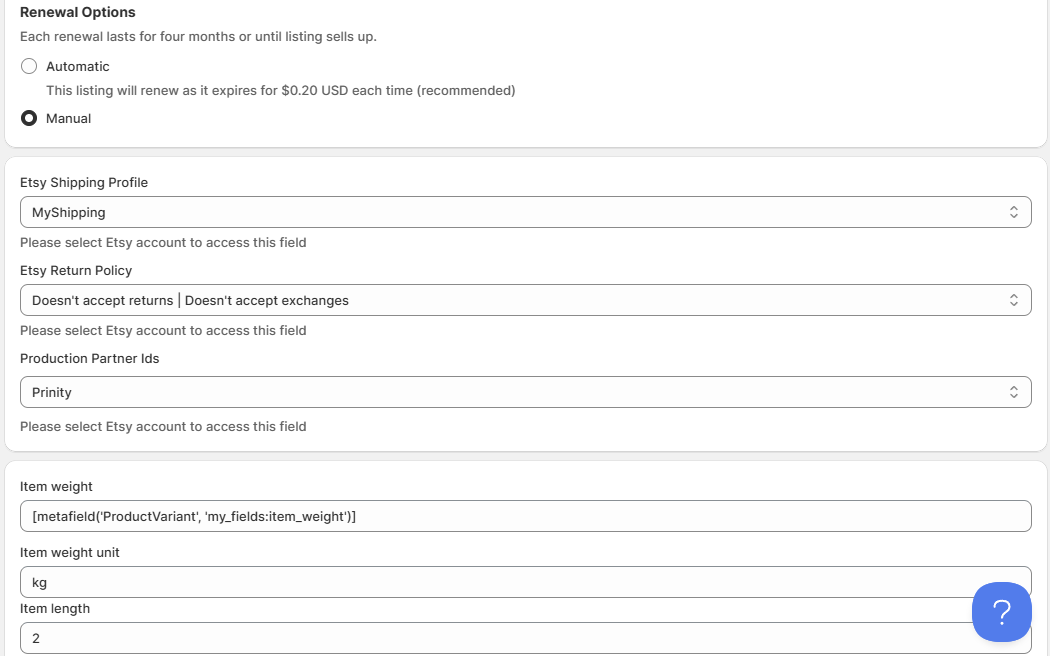
In the Etsy tab, add profiles that will be used to send products to Etsy. Enable automatic renewal or leave it at manual here. Some profiles have to be set up on Etsy first. This includes Shipping Profiles, Return Policies, and Production partner IDs. The options in these fields depend on your Etsy store configuration. Below, add item weight and dimensions if the products will be using calculated shipping.
Enable product creation to configure product tags and specify what kind of product it is. Note that Etsy is focused on vintage and items related to arts & crafts. Check the help article from Etsy for more details on what kind of items you can sell.
Set the target Etsy category and add product specifics below.
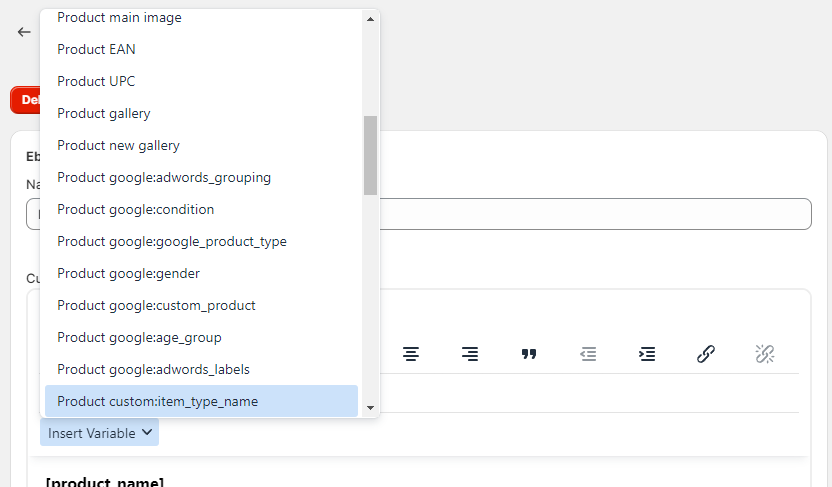
In "Description Templates", you can adjust how the product descriptions should look on the marketplace. Use the editor to add custom text or product information from Shopify, including Metafields:
Send and manage the products
When all profiles are configured, send the products in one of the two ways:
- Select the items in the list and click the "Send to *marketplace*" button at the bottom
- Click the "Send all Not Linked..." button to publish all possible items

After sending the products, check the status in the list. "Linked" items will keep syncing according to Shopify updates. For items with an error status, check the logs to find out more details on the Linking error:

You can find solutions to common errors for Amazon, eBay, and Etsy in the respective articles.
Selling Products mode introduces a way to quickly perform mass actions on all Linked products. Click "Bulk Actions" to see the available options:

From here, you can run an update for all of the connected products, stop the listings on marketplace, or remove the connection between Salestio and marketplaces.